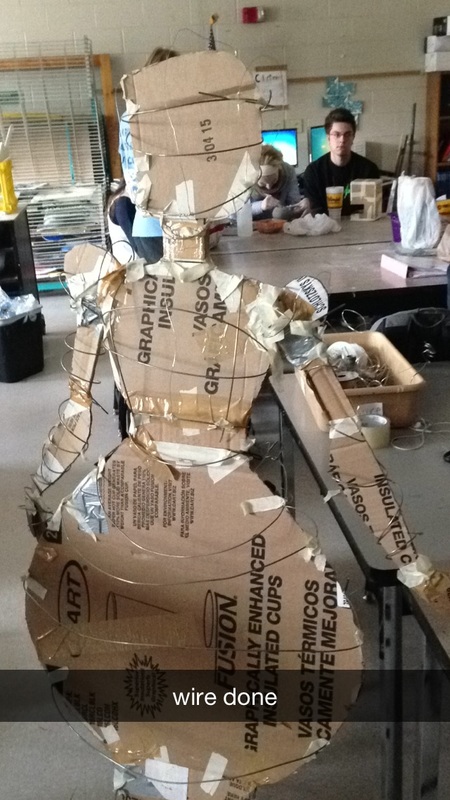
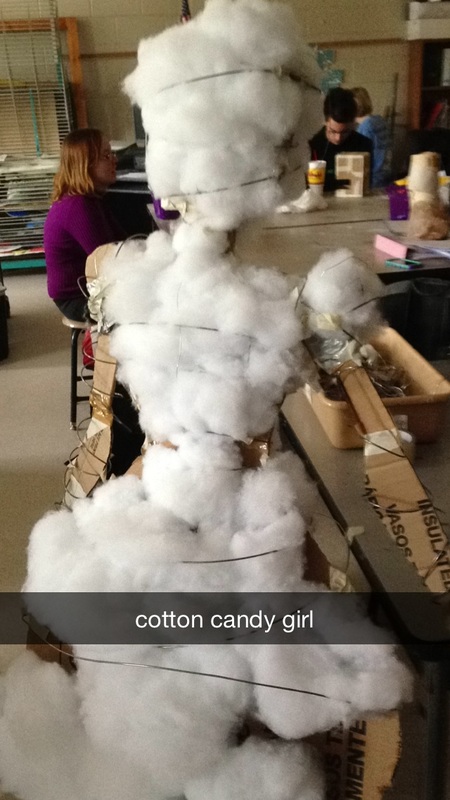
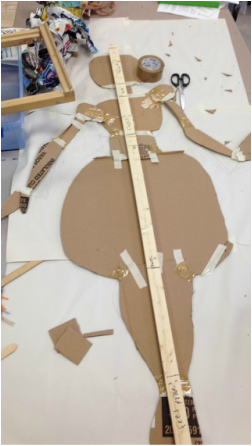
For my figurative piece I made a human sized figure. I knew from the start I wanted to make a life sized figure, but I initially intended to make it tall and thin like a stick figure. I ended up going the opposite direction. I made it short, and round, with very big hips. I started by sketching a reference that would be around the same size as the actual sculpture. Then I traced it onto a piece of cardboard, and used those as a start. I put wires around it, and stuffed stuffing and newspaper between them. Soon enough she looked like a giant marshmallow. I began to realize I made a mistake with the cardboard, I should've made it a little bit smaller than my sketch. The proportions didn't look quite the way I wanted them to, but I decided it was too late to change it. I covered it with newspaper and began paper macheing it (Which I forgot to take a picture of... whoops). I'm still in the process of it. I also have to figure out a way to make it stand on its own. That's served as my greatest obstacle. It's been really fun though, and I'm thankful my wonderful teacher let me take on such a big project :)
In place of the tray/cup/bowl project I worked on my figurative piece.
I was really excited to hear we were doing an unconventional material challenge because I love project runway! (they do a few unconventional challenges per season if you don't watch the show) I was a little less excited when I opened my bag. While the people around me were getting cloth, cds, and other cool things I was stuck with paint cup lids. I had recently gone to NC state with my first period, and we took a workshop where we did brain storming exercises. I used one of those to come up with the idea for my project. I was writing down everything that came to mind and melting them ended up somewhere on the page. The rest of my ideas were all about creating something out of the caps like a chandelier, or a house, but destruction seemed a little bit more interesting. I tested it out and it worked really well. They burned fast, and when they were still hot you could reshape them. I also figured out that if you drew on them the color would stay on even when it was melted. I had some many ideas of what to do after I had come up with this technique, but I really didn't have the time for it. I spent most of the last weeks working on my figurative piece, so I ended up just putting all of my experiments together. My mom hates it, but I think it looks really cool. I think my biggest challenge was not having enough time, and having so many options to chose from. I really could've made anything through reshaping the melted plastic, and I'm a little disappointed I didn't push myself further. I still really like it though, I even hung it in my room.
For my dwelling project I chiseled a castle out of plaster. First I poured a mix of plaster and water into an old milk carton. After it solidified I began chiseling. I had a few reference photos to build of off, but I was pretty lost at first. As the shape got more defined it became easier to chisel. It's not exactly how I wanted it to be, but after a piece broke of I became scared to overwork it. My biggest challenge was fixing it, but luckily another classmate was making plaster the same day it broke. I used her left over to put it back together, and you could barely tell the difference one I smoothed it out. I think fixing it was my greatest accomplishment. I really liked chiseling , I hope to do it gain in the future. Next time I'll put more thought into it beforehand and make a more definite reference sketch.
In class we watched a documentary called "Between the folds", it was a film on origami. I enjoyed learning about the history of origami and its rise to popularity. I like hearing the story of how every year a group holds a competition to see who can out do each other. While art isn't a competition, a competitive element can help advance or create new techniques. Speaking of techniques, I found it really interesting when one of the guys started talking about how he folded his origami with wet paper. I love that kind of story. Adding water sounds so simple, but for some odd reason no one had thought to do it. I also liked how that one really smart guy is basically spending his life folding origami. It's cool how art can affect technology and science. It was a pretty cool movie, the only thing I didn't like was how the old men were complaining that younger artists are getting too "technical" or something like that. To me it just sounded like they were jealous.
For my vessel project I made little glasses out of baby head molds!!! I had a really hard time figuring out what to do for this project, but when we did the mold practice in class I got inspired. Using the molds is really simple, so I made a few different ones.There was one that I had no hope in fixing though, so I turned it into a weird decorative piece. It's the dark one in the back. I had a lot of fun making these, and a lot of fun seeing peoples reactions to them. I made them just in time for halloween too! I'll still probably use them year round though haha.
Some new things I tried during this project, besides the molds, was using the new glazes. We recently got glazes that have little bits of glass(I think?) in them that melt on your piece. The bigger shards come out as blotches, like the ones on the white and blue cup, and some of the glaze came out as little dots. I even tried layering two glazes; yellow underneath with a green speckled glaze on top (the one on the left). This is my relief piece. My initial idea was to make a head as realistic as possible, and then have weird wire things all over it. That didn't really happen haha. I think my main problem was that I didn't map out how high and low each area should've been, unlike my relief eye (which ended up fairly realistic). I just kind of freehanded this. Halfway through I realized what I should've done, but it was too later so I decided to make it more stylistic instead. I love drawing lips like that, so I thought it would be fun to put them on my piece. I was added a lot of texture just because it was fun. There use to be more pieces to this, but I realized that it was better off just being those two pieces. I glued them down on a piece of wood. The lower square is raised higher than the upper square, which gives it a unique look. I kept it white because it already has so much going on. I think it ended up being a kind of cool piece, even though it's not what I imagined.
You can buy it for $30 💃 This is my pit fire piece. I made it by using a paper cup as a template. I added the handle and part that goes upward at the end. I wanted it to look like one of those cups that holds milk for coffee even though it can't be used for food. I carved designs into the sides of it because I thought it would look cool once it got fired. I put an old excuse note, some gum wrappers, copper, and cheerios in my tin foil. You can still see some of the cheerios in the third picture, they shrunk a lot. I think I'll put a lot more materials in the tin foil for my next pit fire piece, but this one ended up cute so I'm happy.
$10 if you wanna buy it B) This is my first mini relief project. I chose an eye because I'm comfortable with using people, or parts of people, as my subject matter. I'm really inexperienced at sculpting so doing something that I'm used to made it easier. I mostly draw, and I think some of my techniques can kind of be seen in this. I used some of the tools to draw on textures and create depth like you would with a pencil. I learned that I really like making weird textures with clay from this project.
|
AuthorWrite something about yourself. No need to be fancy, just an overview. Archives
January 2016
Categories |